Principal Investigator Proposal Tool
The Principal Investigator Proposal Tool (PIPT) is offered for Windows, for Mac OS X and as a jar file for any operating system.
It can be downloaded from the software download page.
Manual
An online manual, which is a work in progress, is available as html and pdf.
Launching the PIPT
After installing and starting the PIPT for the first time, you will be greeted with a welcome message asking you to select a location for the cache. After that you will be informed that your cache requires an update, and you will be asked to log in so that the update can be made.
And finally, the PIPT frame appears and you can start creating and editing your proposals.
Tips and Tricks
Re-using a previous semester’s proposal
If you want to apply for time by essentially using a proposal from a previous semester, here is the quickest way to do this:
- Use the menu item
Online > Import from Server...to download the proposal. Make sure you choose Phase 1 when asked which phase to download. - If the downloaded proposal has a real proposal code (i.e. not a code like
Unsubmited-...), select the proposal and clone it by means of the menu itemProposal > Clone. - Use the menu item
Proposal > Change Semester...to set the semester. - Make any required changes. In particular, update the section with the details of the proposals for the last four semesters.
Calculating the total time used by a block
- Select your block in the PIPT.
- Click on the ‘Clock’ icon in the menu bar
- The popup window will show the total time used.
Gems hidden in the PIPT toolbar
Apart from the usual fare like saving, importing and exporting, the PIPT toolbar offers some interesting functionality, which may help you in creating your proposal.
 Defining an observation with calibrations, science and dithering can be quite confusing, and it can be helpful to have a diagram of what precisely is happening throughout the observation. Such a timeline is generated and displayed if you click the timeline button.
 The clock button lets you view the exposure time, overhead time and total charged time for your proposal and its individual blocks, observations and instrument setups.
 If you want to know whether your proposal is valid, you may use the validate button to check. This will show show you the list of errors found as well as the XML for your proposal. The errors might sometimes be a bit cryptic, but the rule of thumb is that if you get an error, you might just have forgotten to enter some detail. Looking up the affected line(s) in the XML may help you in tracking down what exactly might have gone wrong.
 Similarly to the validate button, the warning button allows you to view any warnings relating to the chosen proposal. These warnings should not be taken lightly – in some cases you won’t be able submit with them. But even if you can submit, a warning may very well suggest there is a flaw in your proposal.
 When you’ve finished your proposal and the validation button doesn’t show any errors, you may submit your proposal by clicking the submit button. You will then be guided through the submission process. If your proposal is large, the first steps of that process may take a few moments, as your visibility windows need to be calculated. However, if there is no progress after a few minutes, the PIPT probably has run out of memory. See the Phase II FAQ for more details.
 In case you need to convert your Phase I proposal into a Phase II one, the proposal conversion button is your friend. A click on it will fetch the Phase II proposal from the server, at least if your Phase I proposal was allocated time by your TAC.
 If you want to copy a Phase I proposal from a previous semester, the clone button might help. But please don’t use it for Phase II proposals – the created copy won’t have a proposal code and you won’t be able to submit it. If you want to recycle an old proposal, have a look at the Gems hidden in the PIPT menu section.
Gems hidden in the PIPT menu
Export as Zip File…
This lets you save your proposal as zip file. If you run into any problems with the PIPT, sending this file to salthelp@saao.ac.za can help a lot.
File > Export Target Data…
This lets you export all your targets in a text file, which you can re-import or use in the Visibility Tool.
Proposal > Show Feasibility
You can use this to find out what the observing windows are for the blocks in your proposal.
Proposal > Change Semester
There usually should be no need to change the semester of your proposal. But if you create a commissioning proposal, you might have to, and this menu item lets you accomplish the task.
Proposal > Customize Hidden Elements
In rare cases you might have to explicitly show telescope configurations and payload configurations. An example would be that you need setups for two position angles in the same observation. Generally, it is a good idea to ask your liaison astronomer before making use of this menu item.
Clipboard
You can use the clipboard for copying blocks and targets between proposals. See the Re-using existing content section for details.
Re-using existing content
In case you want to re-use targets or even blocks from an old proposal, you may utilise the clipboard. These can be added to the clipboard by right-clicking on them in the navigation tree or in a table. In order to copy clipboard content choose the respective option from the pop-up menu for adding/inserting elements.
Downgrading time
While upgrading allocated times to higher priority or stricter observing conditions requires permission from your TAC, you may downgrade up to 3600 seconds. To do so, launch the PIPT and select the General Proposal Information page for your proposal. Underneath the table of observing times you’ll find a button “Transfer time…”, and this button allows you to perform the time transfer.
Defining lots of blocks
If you need to define lots of blocks, you might consider using automatic block creation. To do so, first make sure you have added all the targets you want to use to the proposal.
Then you may create one (or more) block template file(s) in the following manner.
- Create a block as similar as possible to the one(s) you want to add to your proposal. Make sure your block is valid (by using the menu item
Proposal > Validate). - Use the button
Export as Templateto export the block as a template.
You can now copy and tweak the template. Make sure you replace the placeholders, as described below. Create a file for each block you need to add, and put all the files in the same directory. Choose .xml as the filename extension.
Then in the PIPT go to the Blocks form, where you’ll find a button Import multiple Blocks. Clicking on that button leads to the following dialog.
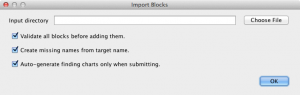
The input directory is the directory where you’ve stored the block files.
It is highly recommended that you opt to have your blocks validated, to avoid unwanted surprises further down the line.
If you don’t replace an —INSERT NAME— placeholder and tick the Create missing names from target name checkbox, meaningful names will be generated from the target name.
In case you have really many blocks you should consider having the finding charts created on submission only. (But note that it remains your responsibility to check the finding charts afterwards!)
The blocks are added in alphabetical order of their filenames.
As mentioned above, the template file exported from the PIPT contains various placeholders. These are:
- —INSERT NAME—
You should replace this placeholder with a meaningful name. If you don’t, tick theCreate missing names from target nameon the import dialog, so that names are generated automatically. - —INSERT TARGET NAME—
This placeholder must be replaced with the target name. A target with the chosen name must exist in the proposal when you import the template file(s). - —INSERT ABSOLUTE FILE PATH—
This placeholder must be replaced with the absolute path of the file you want to attach. - —INSERT ABSOLUTE FILE PATH OR AUTOMATIC—
You have two options. You may replace this placeholder with the absolute path of a finding chart file. Alternatively you may replace it with the wordauto-generated. In case of the latter, the finding chart will be generated automatically either when importing the template file or when submitting the proposal, depending on what you choose in the import dialog.
Copying maximum lunar phases from your phase 1 proposal
When creating your phase 1 proposal, you had to specify the maximum lunar phase for each of the targets. Luckily, you don’t have to retype all these values in your phase 2 proposal. Here is the recipe of how to use the values from your phase 1 proposal.
- Create all of your blocks, and make sure the target is set correctly in the acquisitions.
- Click on the Targets node in the navigation tree.
- Select all rows in the table of targets (or the ones whose phase you want to copy), choose the bulk action “Apply maximum lunar phase to blocks” and click the Apply button.
Existing values for the phase will be replaced. It is recommended that you check the values before submitting the proposal.
FAQs
There are an FAQ for Phase I and and FAQ for Phase II. It is a good idea to have a look at both, as some questions apply to both Phase I and II, and may be answered in only one of the two FAQs.
Ask us!
And if none of the resources answers your question, send an email to salthelp@salt.ac.za. In case your question is specific to your (phase 2) proposal, always include the proposal code (such as 2020-2-SCI-042) in the subject of your email. It can also be a good idea to export the proposal as a zip file (using the menu item File > Export as Zip File) and attach it to your email.